
If you’re a pet parent looking for a fun craft to try, making DIY kitten toys could be a great new hobby. Not only will your feline friend love you for it, but you’ll also have fun in the process of creating them.
Young cats need a rotation of the best kitten toys to ensure they’re getting enough mental and physical stimulation, but this can get expensive if they’re constantly getting bored or losing them. That’s why making your own toys can be an excellent (and rewarding) alternative.
Below, we’ve shared five different toys you can make at home, including catnip macarons, a puzzle toy, a whack-a-mole box, and much more. These crafts are suitable for all skill levels, and some of them take only five minutes to make. Happy crafting!

DIY kitten toy ideas
1. DIY macaron cat toys

These fun toys look like delicious macarons and you can make them in wonderfully bright colours too. They can contain a filling that will drive your cat wild. Just try and refrain from munching into them yourself!
What you’ll need:
- Pastel felt
- Contrasting felt
- Scissors
- Thread
- Hand stitching needle
- Pillow stuffing
- Catnip
- Pencil/pen
Instructions:
- Use an object to outline four equal-sized circles on a piece of pastel-colored felt, about 3 inches wide. For example, I used the bottom of a wine bottle. Then cut each one out so that you do not see any pen marks.
- Cut one circle out of a contrasting piece of felt that is about ½-inch or so larger. Note, that it does not need to be perfect because it will be trimmed later.
- Layer two pieces of pastel felt and thread a needle with a long piece of thread (doesn't necessarily need to be matching thread) and knot the end multiple times.
- Poke through the top layer only, about 3⁄4-inch from the edge. Pull the thread through so that the knot catches in between the two layers.
- Make small stitches around the edges of the felt, keeping a 3⁄4-inch distance from the edge and securing the two layers together. Occasionally, pull tightly on the thread to gather it and keep it appearing ruffled as you go. Note, you do not need to pull hard and you do not want to pull hard enough to risk breaking the thread.
- Keep stitching until you have about one inch left. You’ll notice that pulling the thread may make the piece appear misshapen, but ignore this and keep stitching so that the edges of the circles are together. When you have one inch left to stitch, add about one tablespoon of catnip (if desired), followed by stuffing. Then keep stitching and add more stuffing as needed to fill completely.
- Stitch until you reach the end, and lastly poke through only one layer and then thread the needle through an existing stitch, loop the thread and pull through to create a knot. Repeat at least twice to secure. You should now have a plush macaron shell. Repeat with the remaining two pieces of pastel felt so you have equal-sized plush shells.
- Sandwich the piece of contrasting felt between the two shells. Thread the needle with a long piece of thread and double it up to make it stronger. Knot the two ends together.
- Poke through only the top shell so that the knot is hidden on the underside. Stitch all layers together the same way you stitched the shells, pulling them all together tightly. If possible, try to retrace the stitches you made on the shells originally (as this will look best but is more time-consuming).
- Stitch until you reach the end and pull all layers together tightly before pressing the needle through only one layer and knotting the thread with a double or triple knot the same way you did before.
- Lastly, trim the excess 'filling' so that it fits close to the shells, taking precautions so that you don’t trim the ruffles. Then your macaron is all done!
2. Knotty spider
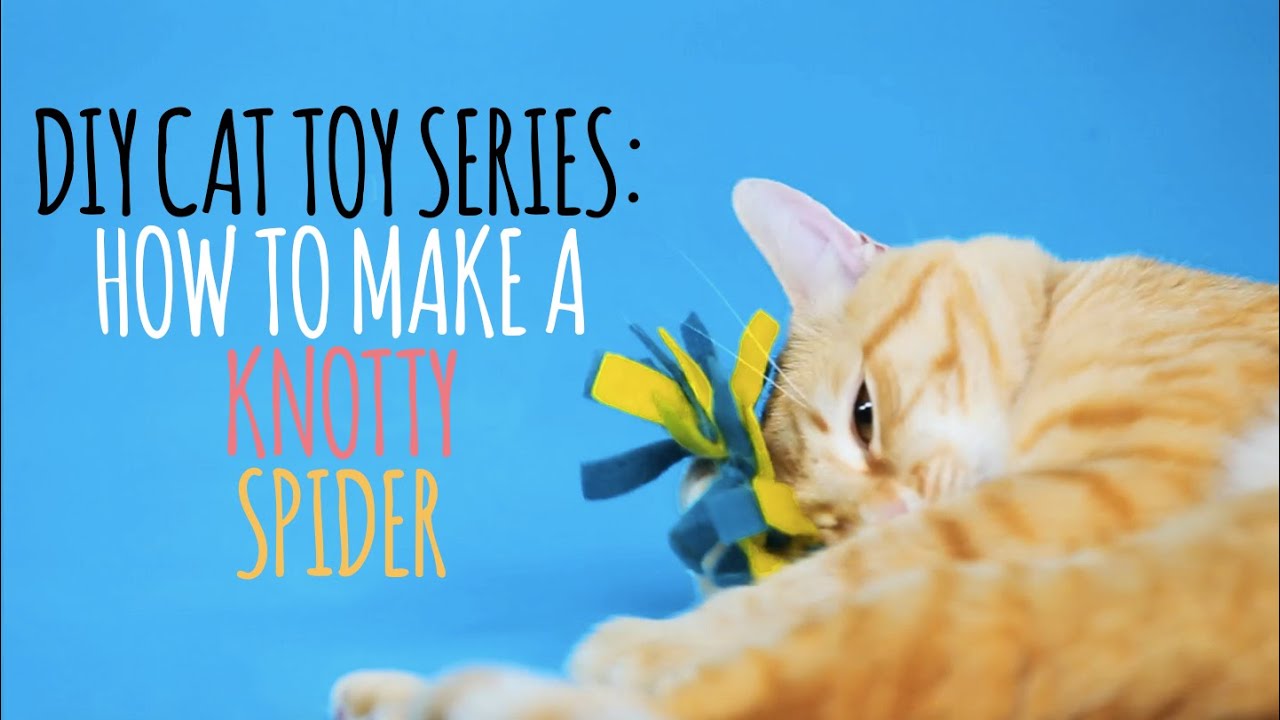
Credit: YouTube: Purina Friskies
Made from felt and a plastic ring from a milk container, this cheap and cheerful lightweight toy is ideal for swatting, biting, and pouncing. It will keep your little bundle of fluff happily engrossed for hours.
What you’ll need:
- Two sheets of felt
- A large plastic ring from a milk container
- Scissors
Instructions:
1. Cut the felt into slim strips maybe 2cm thick.
2. Wrap the felt around the ring and create a knot.
3. Keep tying them until you use all of the felt
3. Kitten puzzle toy
Credit: YouTube: Cat Lessons
It’s never too early to provide your kitten with toys that will stimulate both their bodies and their minds, and this puzzle toy is sure to give their brain a workout. We recommend filling the cavities with a few of the best kitten treats to make this toy even more exciting for your feline fur baby.
What you’ll need:
- A box with a paper injection mold
- A pencil
- Box cutter
Instructions:
1. Remove the paper injection mold.
2. Draw holes with a pencil on the underside of the mold.
3. Cut the holes using the box cutter and smooth the edges.
4. Disassemble the box and draw a frame on the top.
5 Cut the frame and assemble the box.
6. Insert some toys, place the mold back in the box upside down and allow your cat to try and grab the toys from the holes.
4. Feather cork cat toys

Feathers tap into a cat’s natural predator instinct – they associate feathers with birds and small animals. While that may sound a little gruesome, adding feathers to play at least focuses their attention on a toy.
What you’ll need:
- Corks
- Feathers
- Screwdriver
- Hot Glue
Instructions:
- Drill a hole into your cork using a screwdriver. Be sure it is deep enough to fit the stems of the feathers.
- Using some hot glue, secure the feathers into the cork.
- And voila! You have a feather cork cat toy for your playful feline friend.
5. DIY whack-a-mole cardboard cat toy
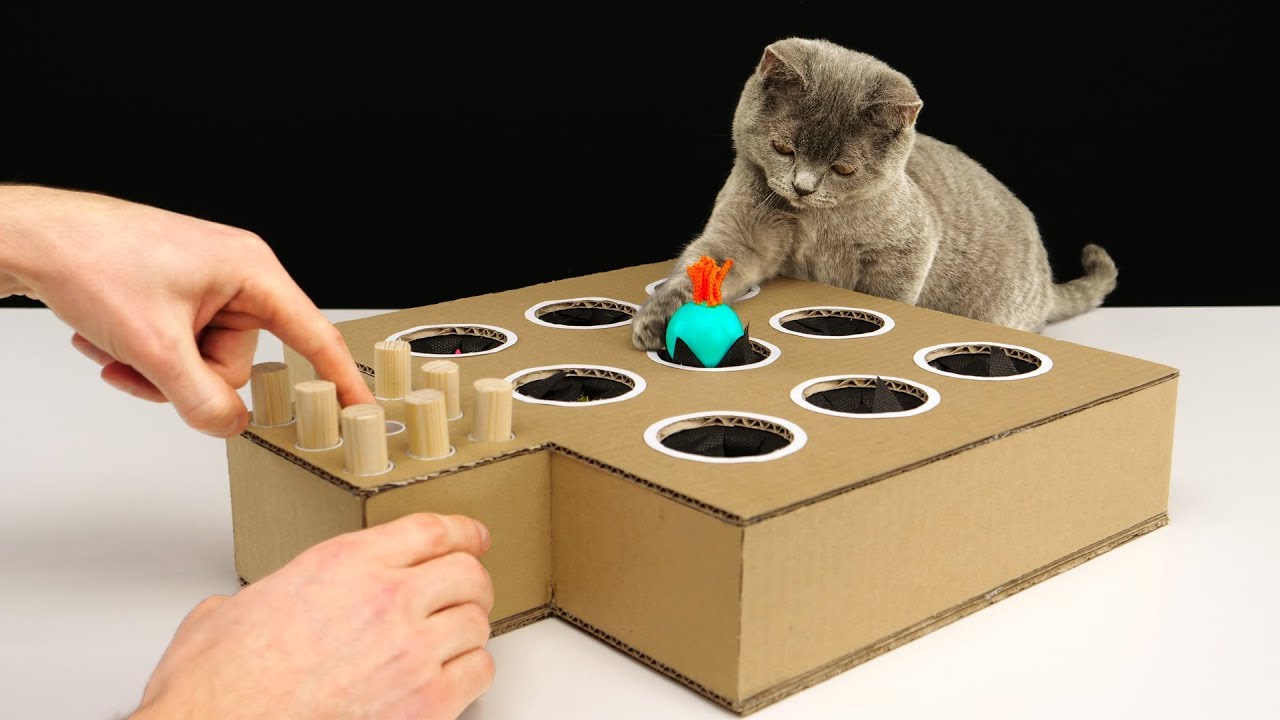
Credit: YouTube: The Q
Guaranteed to provide you and your feline friend with hours of fun and laughter, this entertaining toy will help to train your kitten’s reaction times and concentration, making it both enjoyable and educational.
What you’ll need:
- Cardboard
- Ruler
- Pencil
- Box cutter
- Wire
- Wire cutter
- Tube
- Some toys
Instructions:
This one is quite a complicated build and it’s far easier to watch the video than to follow a set of written instructions.
How do you mentally stimulate a kitten?
There are so many ways to mentally stimulate a kitten, and the good news is that none of them are too taxing! After all most kittens are highly inquisitive, eager to learn, and want to explore how the world works, so they don’t take much encouragement.
1. Play
Dr. MacMillan says: "The most obvious way to stimulate a kitten is through play. Play is how kittens learn, socialize, and practice natural behaviors like running and pouncing. The act of stalking and anticipating which way a toy is going to move next, really gets their brains whirring.
"Try a mixture of toys such as fishing rods, balls, and kicker toys to keep them interested. They will probably enjoy playing with you the most, but many kittens will also go for interactive or self-powered toys, especially while you are out."
2. Climbing spaces
"Providing your kitten with plenty of places to climb (like the best cat trees) and hide will also keep them mentally stimulated as well as physically active."
3. Puzzle feeders
"Using puzzle feeders [like this one on Amazon] or treat dispensers is a great way to motivate some kittens. Encouraging them to work their brains for a tasty reward will keep boredom at bay."

4. Teaching tricks
"Teaching a cat to do tricks is possible with patience and positive reinforcement. Just keep training sessions short to make sure your kitten stays engaged."
5. Quality time
"Spending time simply stroking your kitten will also be good for their mental well-being too."
6. Cardboard boxes
"If all else fails, give them a cardboard box! Most kittens, and even adult cats, love a cardboard box!"
What toys do kittens enjoy the most?
We asked Dr. MacMillan what the best type of kitten toy is – here's what she said:
"It's best to provide your kitten with a variety of toys while you work out what their favorites are, as each cat is different. There is not one perfect toy for all kittens. Plenty love a feather on a stick to grab or a crinkle ball to bat around, whereas others go mad for a catnip-filled soft toy.
"To stop them becoming bored, try using a toy rotation system rather than having them all out at once. By keeping some of their toys out, then after a few days, swapping them over for others, you will help to keep things fresh and interesting for your kitten.
"As a reminder, if you decide to use a laser pointer toy with your kitten, make sure you give them something to catch as a reward at the end. If they have no physical ‘kill’ at the end of their game, it can lead to feelings of frustration and anxiety."
Enjoyed exploring these DIY kitten toys? You can also try your hand making one of these DIY cat hammocks for felines who love to lounge up high or a DIY cat window boxes you can try at home. Or, once you've made these creations, learn how to play with kitten

Rebecca is a veterinary surgeon who graduated in 2009 from the Royal Veterinary College in London. She has a wealth of experience in first opinion small animal practice, having done a mixture of day-to-day routine work, on-call emergency duties and managerial roles over the years. Rebecca enjoys medicine in particular and she is proud to have recently achieved a BSAVA postgraduate certificate in small animal medicine (with commendation).

