If you've got an adventurous feline in your household, creating your very own DIY cat hammock is a great way to let kitties explore up high.
An ideal addition to a wall or window, cat hammocks offer your feline greater visibility, as well as providing a convenient lounge spot once they've reached their destination. Alternatively, you can make one for adding to ground level that acts like an elevated cradle to keep paws completely off the carpet.
Consider cardboard as a basic material or go all-out and reach for the macramé to add extra style. Whatever your skill level, these DIY cat hammocks can be created on a budget so you don't have to spend a fortune to treat your feline friend.
Be sure to nip over to our DIY cat bed listicle too for even more inspiration.
1. Macramé plant hanger DIY cat hammock
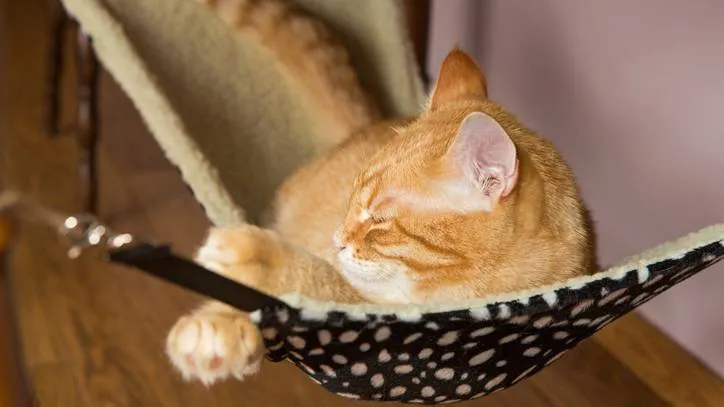
@blondesigns DIY Cat Hammock 🌿🐈⬛ ##tiktokdiy ##thrifted ##homedecor ##catsoftiktok ##homediy
♬ Send Me on My Way - Guy Meets Girl
Did you know you can use a simple (yet stylish) macramé plant hanger to create a stylish DIY cat hammock for your feline? Home enthusiast Annika at @blondesigns created this simple hanger that you can apply window-side.
If you're worried about whether your hammock can take your kitty's weight, a good idea is to keep as low to the sill as possible once hung - just in case.
To make your own macramé plant hanger DIY cat hammock, you’ll need the following items:
• Macramé plant hanger
• A basket
• Large hook (can be picked up from hardware stores)
• Cat blanket or cushion (optional)
Directions:
1. Attach the large hook to the wall corner of a window ensuring it's completely stable.
2. Hang the macramé plant hanger from the hook using a macramé metal ring.
3. Place the basket into the center of the macramé plant hanger making sure all the ropes hold the full circumference of the basket.
4. To entice your cat to use the hammock or to create optimum comfort, place a cat blanket into the basket. A round cushion can also work well.
2. Wooden box DIY cat hammock
@arts.and.cats my cat is too fat for this hammock I made 😹 ##catsoftiktok ##cat ##fyp ##macrame ##macrametutorial ##macramelove ##art
♬ She Share Story (for Vlog) - 山口夕依
Macramé cat hammocks don't always need to be round in shape. Why not transform a basic wooden box into a swinging cat hammock?
TikTok user @arts.and.cats created this DIY for her cat, but found it was too small so be sure to check the size of the box by placing your feline inside before you get crafty!
To create your own wooden box-style cat hammock, you will need:
• 1 wooden box
• Macramé rope
• Macramé metal ring (for hanging)
• Cat blanket (optional)
Directions:
1. Wrap macramé rope around the outside of your wooden box.
2. Tie and knot more rope to the sides of the box creating a macramé plant hanger style.
3. Use a macramé metal ring to hang the bed and add additional embellishments to the hammock if desired. You can also place a cat blanket inside the basket to create a cozy sleep environment.
3. Cardboard box DIY cat hammock
Any cat owner knows their feline friend just can't get enough of cardboard boxes so it makes perfect sense to build a hammock inside. This creative DIY by AnimalWised is the perfect lazy pitstop for chilled moggies.
To create your own cardboard box-style cat hammock, you will need:
• 1 tall cardboard box
• Marker
• Utility knife
• Fabric
• Pet-friendly paint
• Scissors
Directions:
1. Mark out sections on each side of the box leaving a 5cm margin from the edges. You will need four even panels on the sides of the box.
2. Cut out the panels with a box cutter or similar utility knife. When the panels are removed you will be left with a structure allowing entrance from all sides.
3. Paint all the sides in non-toxic, pet-friendly paint and leave to dry.
4. Cut out a square of fabric larger than the size of the box to allow for a big enough dip for your cat in the hammock.
5. Cut each corner of the square with a diagonal slit about four inches long.
6. With a sharp object, drill into the upper part of all sides of the structure.
7. Once all the holes are made, pass the split corners of the fabric square through and tie them in a firm knot to create the hammock.
8. Add further decorations or cat toys as required. You could opt to add extra fabric to the bottom of the box.
4. No-sew DIY cat hammock
Don't have sewing skills? No problem! This no-sew DIY cat hammock by Cats and Pats can be put together in a jiffy and it's rather budget-friendly too with many materials sourced from your local hardware store. Added bonus!
To create the no-sew DIY cat hammock you will need:
• 2 half inch bars of PVC pipe
• 4 90 degree elbows
• 4 connecting T's
• Saw
• Power tool for cutting
• 1 old pillowcase
• Scissors
Directions:
1. To get the right size for the shorter sides of your hammock, place a T and stretch the shorter length of the pillowcase across the pipe to act as a measure. Mark the PVC pipe, then cut to size.
2. Place another elbow on the other side of the PVC pipe and slide it in to the top of pillowcase. It should be a snug fit inside. Repeat process until you have two same-size PVC pipe frames.
3. Trim off the edge of the pillowcase.
4. Place a T on a longer length five foot PVC pipe to act as a measuring guide. Hold the pillow case at the end of the T and stretch over. Once again, mark the pipe where the pillowcase ends and cut to size.
5. Place another T on the other side of your newly cut pipe. Repeat the process until you have two same-size long PVC pipe frames. You should now have all four pieces of the hammock frame.
6. Use a power tool to cut an extra four short PVC pieces to 1 and half to 2 inches.
7. Assemble the frame together using the elbows and T's.
8. Slide the pillowcase over the frame. You can remove the bottom shorter frame to make this easier, then place it back.
9. Mark out 4x 5 inches out of the remaining PVC pipe and cut using a power tool to create four legs. Insert them into the connectors.
5. DIY cat hammock wall
Fancy creating a whole DIY playground for your felines to climb? This tutorial by Aaron Fixes Stuff features a good few steps but it's so easy to follow along, your kitty will soon be hanging around in style.
To create the DIY cat hammock wall you will need:
• 1 long PVC pipe (2 inches)
• Power tools or hacksaw
• 2 PVC caps
• Stud finder
• Drill
• Lag screw
• Cardboard
• Rope
• Hot glue gun
• Scissors
Directions
1. Cut a PVC pipe into 6 and 12 inch pieces using a power tool or hacksaw.
2. Drill a hole into the center of 2 PVC caps.
3. Use a stud finder on the wall to find studs. Drill holes into the studs.
4. Place a lag screw through a PVC cap and into the wall.
5. Secure a piece of rope between the cap and the wall and tighten the bolt to make sure that the rope stays secure.
6. Cut a piece of cardboard in the same diameter as the pipe.
7. Make an off-center hole in the cardboard piece.
8. Place hot glue on the edge of the rope and place it through the hole in the cardboard. Let it dry.
9. Put hot glue on the perimeter of the PVC pipe, then secure the cardboard circle to the end of the pipe.
10. Place a bead of glue on the cardboard every half circle or so, twisting and sticking the rope around and down using a tight circular motion until it covers the entirety of the circle. Use longer lines of glue as you approach the outer layer.
11. Once you reach the PVC pipe, continue to wrap the rope around without glue.
12. Place a PVC cup on the end of the pipe and mark a line to indicate where the rope should stop. Cut the rope and use hot glue to stick it down.
13. Put the PVC pipe into the cap and drill two pilot holes into the sides of the cap. Drill a screw through to keep the cap and pipe secure to each other.
14. Wrap the rest of the rope around the cap, cut the edge and use hot glue to secure the rope.
15. Repeat the process at least once to make another perch so you have two equally in line with each other on the wall. However, you can make as many as you like to create a vertical cat playground.
16. Finally, create a hammock by sewing two pockets into cloth so you can then insert the perches.
6. Under the table cat hammock

If space is at a premium then you may want to make use of existing furniture rather than using up what little you have. This example from Martha Stewart and Boxwood Avenue could provide a novel solution.
You will need the following items to create your own under the table cat hammock:
- 1 yard of fabric
- 12 inches of twill tape
- Batting
- Quilter's ruler
- Fabric scissors
- Straight pins
- Sewing machine and supplies
- An ideal side table
Directions:
- Measure your table. Cut two squares of fabric to match your table dimensions, in addition to 1 inch for seam allowance.
- Cut eight strips of cotton measuring 12 inches.
- Leave aside a fabric square. On the other, pin two strands of ribbon at each corner about 1 inch each from the corner at a slight diagonal angle. Pin the ribbon to the right of the fabric.
- Place the two squares side by side so the wrong sides are showing, then pin them in place.
- Stitch around the perimeter of the squares, leaving one side open. Curve the sitch at the corners for a rounded edge, and trim the corners.
- Turn the cat bed right side out and press the seams. Cut a piece of batting roughly the size of the cat bed.
- Put the batting in the bed, fold and pin the open side closed, and close the opening.
- Tie the bed onto your table.
7. Wall-mounted cat hammock

Another solution to the lack-of-space conundrum is to move the hammock away from the floor, and onto the wall, as brought to you by The Merry Thought. Here’s how it’s done.
To make your own wall-mounted cat hammock, you will need:
- Wood (1 x 4 x 8”)
- Miter saw
- Table saw
- Sandpaper
- White paint
- Paintbrush
- Canvas
- Sewing machine
- Iron
- Pins
- Scissors
- Staple gun
- Drill
- Screws
- Brackets
Directions:
- Cut two 12″ pieces of wood from the board with the miter saw.
- Cut them down the center wiyh the table saw.
- Lightly sand the edges.
- Paint all four pieces of wood, and leave them to dry.
- Cut a 28″ x 14″ piece of canvas.
- Iron in half an inch along each side, fold over another half inch, and iron again.
- Straight stitch along each side.
- Lay the fabric with the bottom facing up. Fold one of the short sides along the side of one of the painted boards, and use the staple gun to secure it.
- Take the board and flip it in toward the center so that it’s wrapped in fabric. Pull it tight, and set another piece of wood on top, sandwiching the fabric in between.
- Pre-drill two holes towards one end of the wood pieces through all three layers.
- Secure using one quarter-inch screw.
- Place the bracket on the board with the opposite end to the previous holes you drilled.
- Mark and pre-drill at each of the spaces for screws along the bracket.
- Secure the bracket using one quarter-inch screw.
- Repeat with the opposite side, and attach the brackets to the wall.
8. Cardboard window box
Does your cat love nothing more than sitting in a cardboard box? This brilliant tutorial from YouTuber Cat Toy Lady takes what might have ended up thrown away and turns it into a kitty haven.
To make it, you will need:
- 1 medium-sized cardboard box
- 2 rolls of contact paper
- White duct tape
- Box cutter
- Scissors
- Black marker pen
- Ruler (optional)
- Blanket (optional)
Directions:
- Using a black marker pen, mark half an inch from the bottom of the box on both the left and right side and draw two lines moving downwards. You can use a ruler if you wish.
- Draw a line all the way across the box to join the two smaller half and inch marks.
- Cut down both sides using a box cutter
- Using the back of your scissors, score along the bottom line so your box will easily fold and open
- To reinforce the box, tape all the way around the bottom of the box a few times with the duct tape
- Snip each corner of the tape and fold each bit down onto the base of the box
- Cut the extra flaps at the top of the box off and put them aside
- You only need an inch and a half for the front flap, so measure and cut off any extra cardboard in a straight line
- Add a half inch crease onto the front flap
- Tape the two extra flaps from the top of the box to the bottom as a second reinforcement
- Run three more pieces of tape to the front flap of the box
- To make the box prettier, cut off the two front corners
- Measure the amount of cover paper you will need by lining up the sides with the box then, starting with the inside of the back of the box, wrap it around and trim any excess around the two front corners ensuring it's all fully covered
- Place your cat's blanket inside to make it more comfortable and place it on your windowsill for them to enjoy

